
In case you encounter any issues, please don’t hesitate to contact us via Technical Support. We’re here to assist and guide you through the process to ensure your integration is completed successfully.
Step №1: Get Altery Business Platform Access
Acquire your credentials for the Altery Business Portal. You can complete the registration process by yourself, and our team will be happy to guide you and assist with any issues if needed.
Log in to the system and ensure that you have access to your dashboard.
Get access to the Sandbox environment — a test environment that allows you to interact with the system in a demo mode without affecting production data.
Step 1 is considered complete once you have access to the system in both the Production and Sandbox environments.
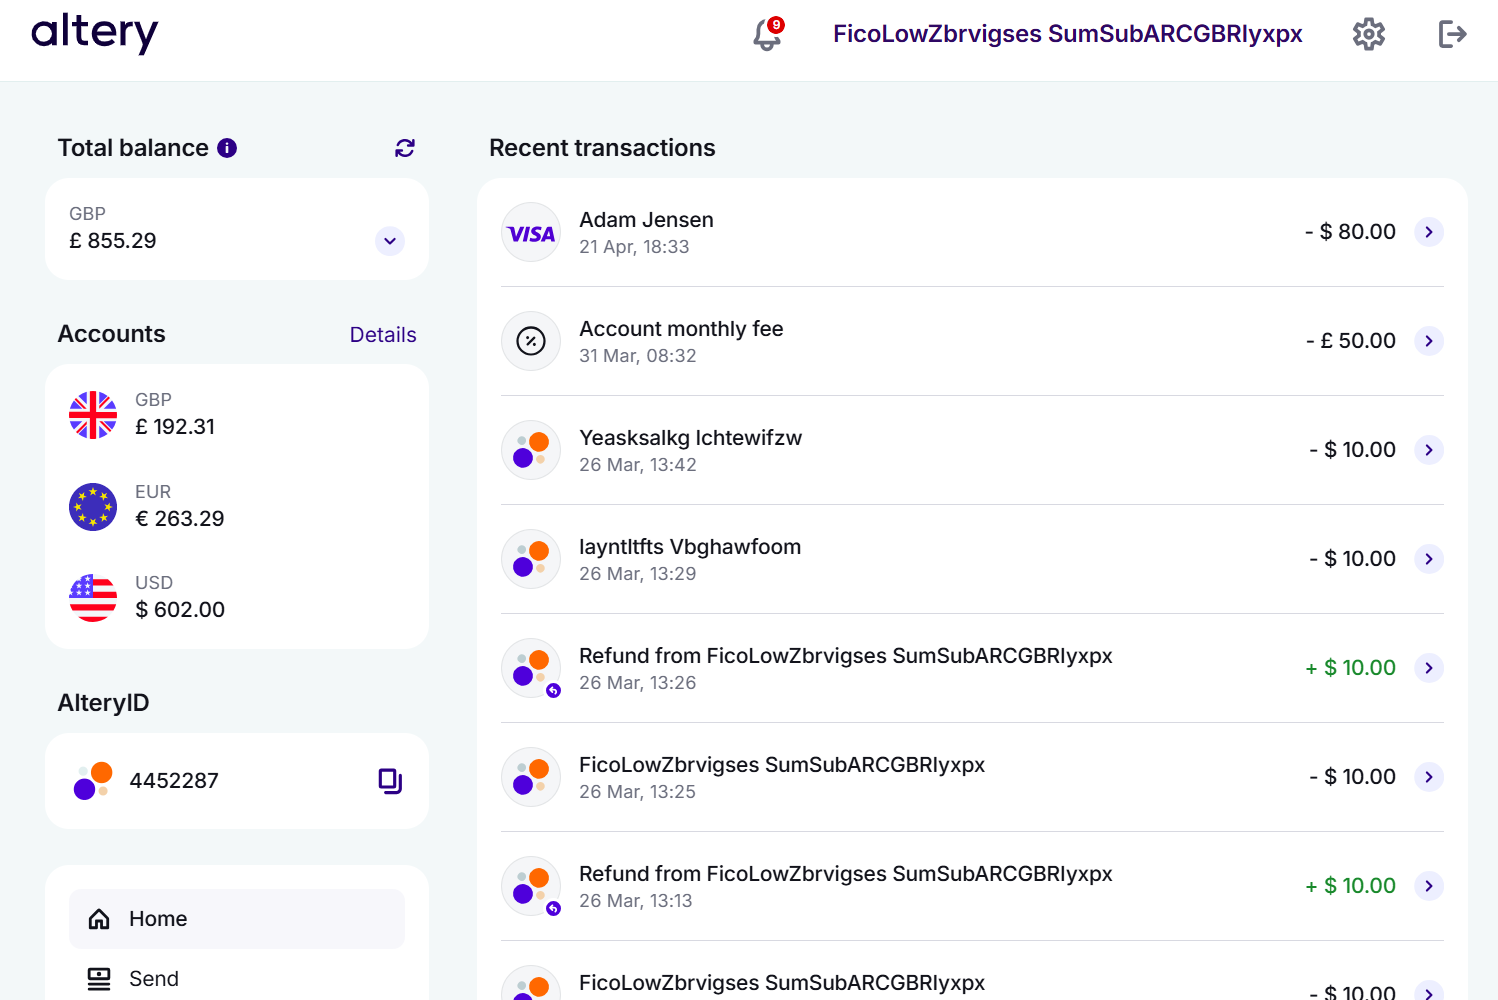
Altery Business Platform Dashboard Example
Step №2: Generate API Key
- Log in to the selected environment (Sandbox or Production) by entering your credentials.
- Open Settings (gear icon, top-right corner) and navigate to API Keys and Credentials.
- Select Add Key, then specify your IP address and the desired key name:
IP address: the address of your server that will communicate with our server.Key name: any appropriate human-readable name of your choice.
- (Optional) Provide OTP-code which was sent to your registered mobile phone to confirm the key generation.
- Download the generated API key and extract the received files to a secure location.
The archive contains three files; make sure you have all of them:
Altery_<X-Key-Id>.pem— PEM file with private RSA key for signing algorithm.Altery_<X-Key-Id>_rsa— private RSA key in a raw format.Altery_<X-Key-Id>_rsa.pub— public RSA key for signature verification.
Store these files in a secure location and do not disclose them to any third party.
The archive name and all three files contain in their naming X-Key-Id: it is your individual API key, you need to use afterwards for API requests.
Step №2 is completed once you have the API key in the system and the three corresponding files downloaded.
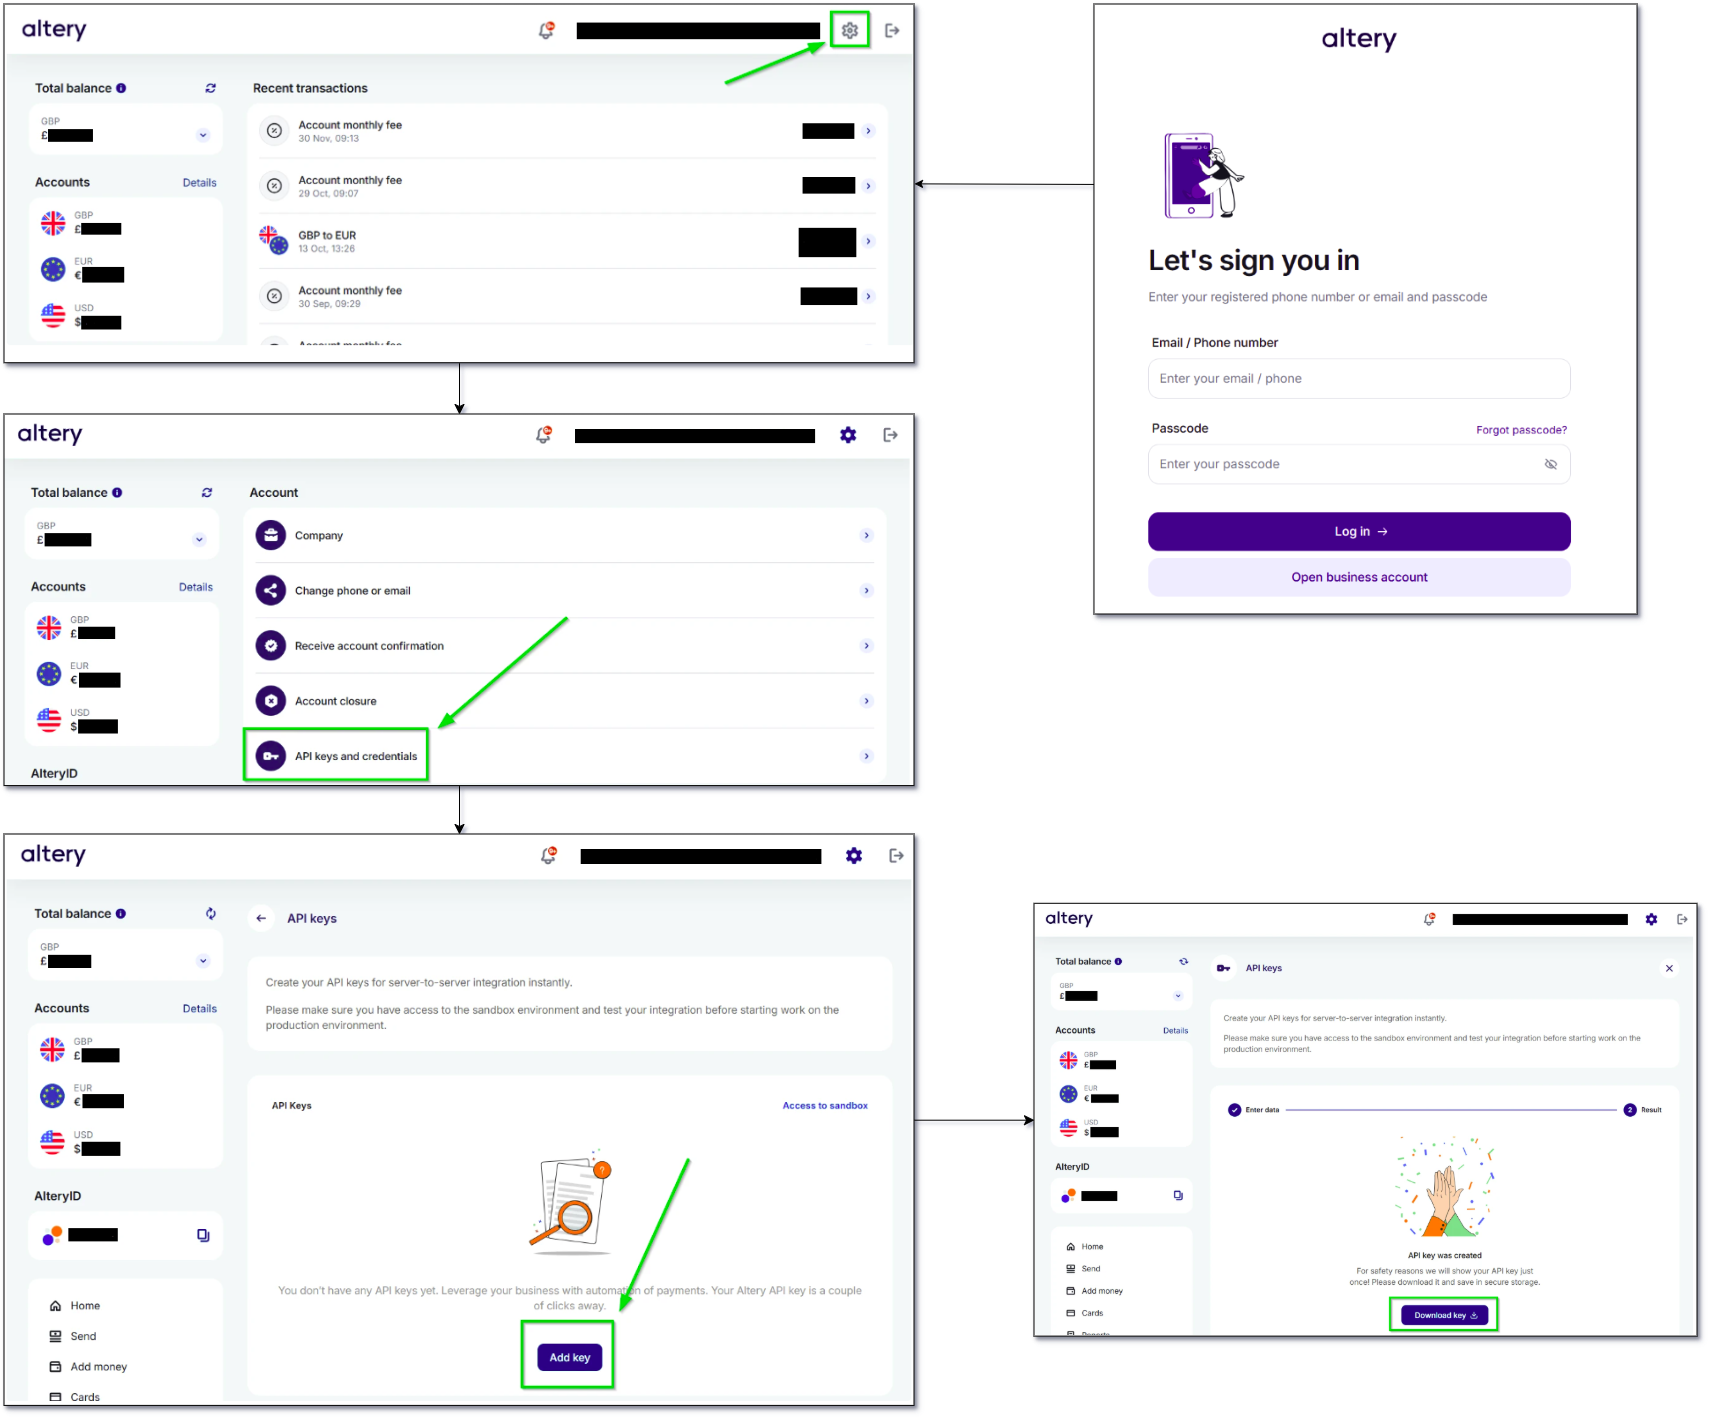
The Algorithm of API Key Generation
Step №3: Use API Key for Signature Calculation
We recommend using Postman collection, so it can ease your setup experience. The signature will be calculated automatically based on provided variables. For machine-to-machine integration please use the guidance below.
Once you generated your dedicated API key you want to use it for all API requests.
Each request to Altery API requires two headers to be presented:
X-Key-Id– The key is provided by API key generation: you can take from generated API key on the Step №2. It is a static value; You need to configure it only once and change only in case of a new API key usage.X-Signature– The signature provided by encryption algorithm. It is a dynamic value, unique for each HTTP request. You need to calculate it by using your private RSA key. We need such value to be sure the request was sent specifically from you and has not been modified in process, so we need the signature for security purpose.
 function create_signature(request, private_key):
    # Step 1: Build string to sign
    string_to_sign = build_string_to_sign(request, separator)

    # Step 2: Convert to bytes (UTF-8)
    data_bytes = utf8_bytes(string_to_sign)

    # Step 3: Sign data using RSA private key
    signature_bytes = RSA_sign(private_key, data_bytes)

    # Step 4: Encode signature to Base64
    signature_base64 = Base64Encode(signature_bytes)

    return signature_base64


function build_string_to_sign(request):
    string_to_sign = empty

    if request.body is null OR whitespace:
        path = extract_url_path(request.original_url)
        string_to_sign = path
    else:
        string_to_sign = request.body

    return string_to_sign


function extract_url_path(original_url):
    # Extract everything after the domain name
    # Example:
    # https://api.domain.com/v2/payments → /v2/payments
    pattern = "^http[s]?://[^/]+(/.+)$"

    match = regex_match(original_url, pattern, ignore_case = true)

    if match exists:
        return match.group(1)
    else:
        return ""
static string SignRequest(string pemText, string path, string? body = null)
{
using var rsa = RSA.Create();
rsa.ImportFromPem(pemText);
var dataToSign = body ?? path;
var signatureBytes = rsa.SignData(
Encoding.UTF8.GetBytes(dataToSign),
HashAlgorithmName.SHA512,
RSASignaturePadding.Pkcs1
);
var signature = Convert.ToBase64String(signatureBytes);
return signature;
}import base64
from cryptography.hazmat.primitives import hashes, serialization
from cryptography.hazmat.primitives.asymmetric import padding
def sign_request(pem_text: str, path: str, body: str | None = None) -> str:
private_key = serialization.load_pem_private_key(
pem_text.encode(),
password=None
)
data_to_sign = body if body is not None else path
signature_bytes = private_key.sign(
data_to_sign.encode("utf-8"),
padding.PKCS1v15(),
hashes.SHA512()
)
return base64.b64encode(signature_bytes).decode("utf-8")Once you created the signature based on your request, then Step №3 is completed.
Step №4: Make a Simple Request
We present the simple request for balance retrieving, so you can check you have successfully provided your individual X-Key-Id and calculated X-Signature values:
using System.Security.Cryptography;
using System.Text;
using var httpClient = new HttpClient();
httpClient.BaseAddress = new Uri("https://api.sandbox.altery.com");
httpClient.DefaultRequestHeaders.Add("X-Key-Id", "<your API Key ID>");
var pemText = File.ReadAllText("<path to your PEM private key>");
var getBalancesPath = "/v1/user/balance/total";
var getBalancesRequest = new HttpRequestMessage(HttpMethod.Get, getBalancesPath);
getBalancesRequest.Headers.Add("X-Signature", SignRequest(pemText, getBalancesPath));
var getBalancesResponse = await httpClient.SendAsync(getBalancesRequest);
var getBalancesResponseData = await getBalancesResponse.Content.ReadAsStringAsync();
Console.WriteLine(getBalancesResponseData);
static string SignRequest(string pemText, string path, string? body = null)
{
  using var rsa = RSA.Create();
  rsa.ImportFromPem(pemText);

  var dataToSign = body ?? path;

  var signatureBytes = rsa.SignData(
      Encoding.UTF8.GetBytes(dataToSign),
      HashAlgorithmName.SHA512,
      RSASignaturePadding.Pkcs1
  );
  var signature = Convert.ToBase64String(signatureBytes);

  return signature;
}curl --location "https://api.sandbox.altery.com/v1/user/balance/total" --header "X-Key-Id: <X-Key-Id>" --header "X-Signature: <X-Signature>"Step №5: Make a Payment
You are on the final step: all previous steps were needed specifically for such moment!
Check your AlteryID:
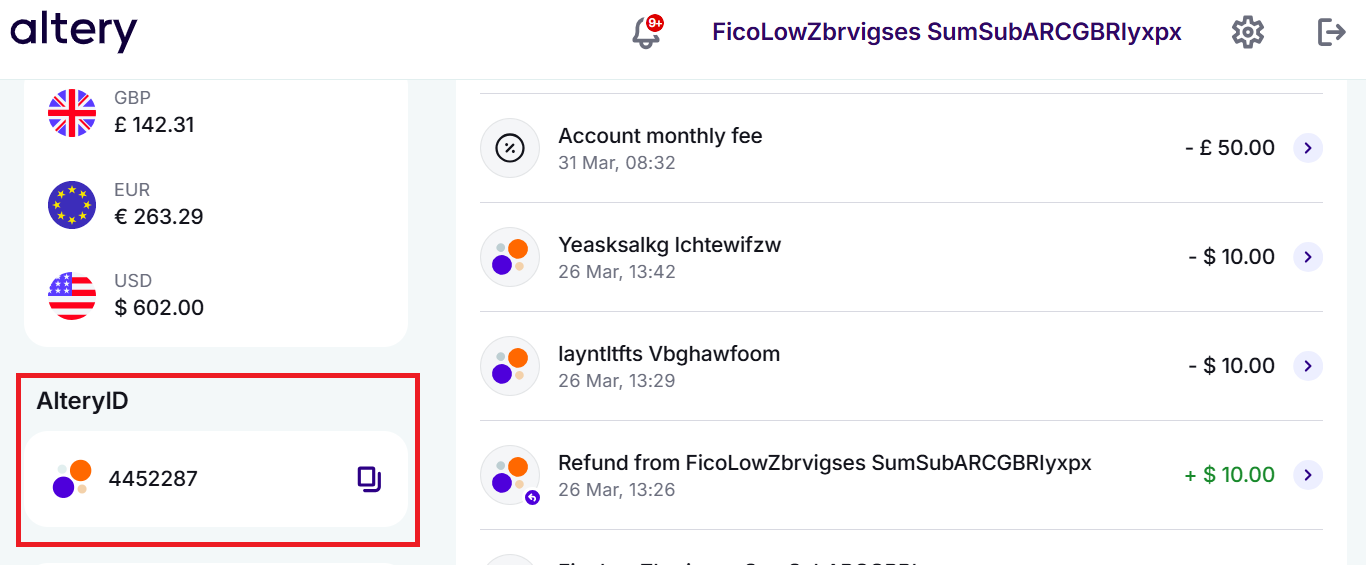
The Altery ID for Payments Processing
Send request for payment processing:
POST https://api.sandbox.altery.com/v2/payments

Headers:
- X-Key-Id: your API key acquired on Altery Business Platform
- X-Signature: the calculated value based on script in step #3

Body: {
    "payments": [
        {
            "to": {
                "provider": "card",
                "identity": {
                    "fullPan": "4000000000000085",
                    "cardHolder": "Adam Jensen"
                },
                "currency": "USD"
            },
            "from": {
                "provider": "eWallet",
                "identity": "<YOUR_ALTERY_ID>",
                "currency": "USD",
                "amount": 20
            }
        }
    ]
}

Responses:
- 200 (The request for payment is completed successfully)
- 401 (Not authorized, the API key or Signature was not correct)
- 422 (Unprocessable, contact with us for more thorough research)
In case you receive successful HTTP status code — the final step of this quick start guide is complete! Now you're able to send payments and retrieve your current balances.